1977 Coachman Cadet Vintage Camper Renovation
Remember the little vintage camper my husband drove into our yard at midnight back at the beginning of Summer? It sat in our backyard for most of the Summer, while I focused on fixing and selling our RV among other things that were higher on my to-do list! As the last remaining days of Summer are ticking away, I knew I needed to get going on this project so I could move onto other things. Thanks to amazing friends and neighbors, we knocked this renovation out of the park in just over a week!
The Process
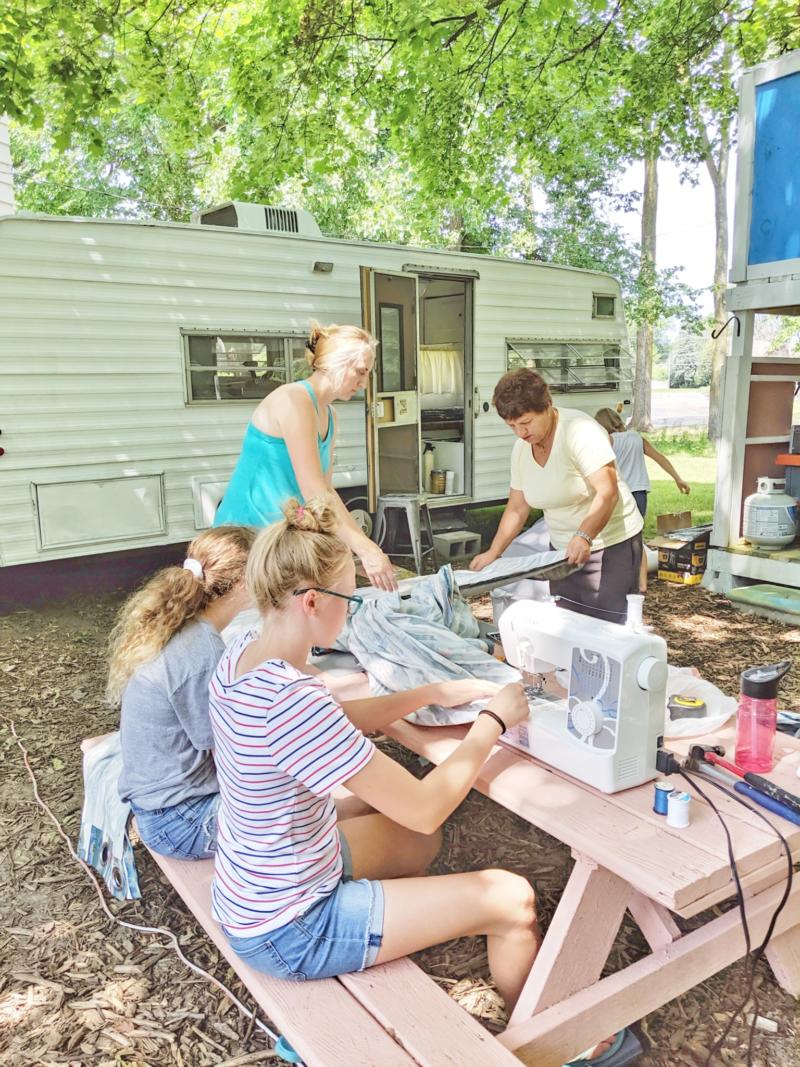
My friend Julia and her kids drove up from Chicago to help paint, clean and sew. My neighbor made curtains and helped with the upholstery. This camper has been a community labor of love!
Julia and her kids have traveled from Illinois to visit, every August for multiple years now. In recent years, our adventures have included trailer flipping with bio, foster and adopted kids in tow. Some of you may remember the trailer we flipped last year, or the time she took the night shift with our drug addicted newborn, or the time she prayed by my bedside after I almost died during a scheduled C-section. Everyone needs a Julia in their life.
I’ve been blown away and greatly encouraged by the messages many of you have sent in response to our media coverage this past few months. THANK YOU for catching the heartbeat of our family. It’s not that we love fixing up RV’s in hopes of striking it rich or becoming famous. It started out as an affordable way to travel and make memories as a family. It has quickly become a great way to teach our kids good work ethic, supplement our income, fund adoption expenses, buy school supplies, braces and lunch meat.
Before and After
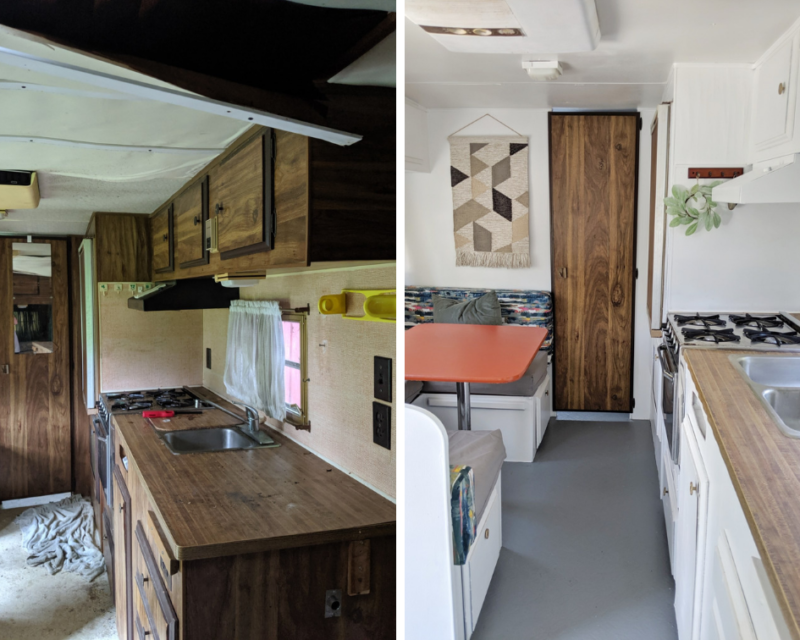
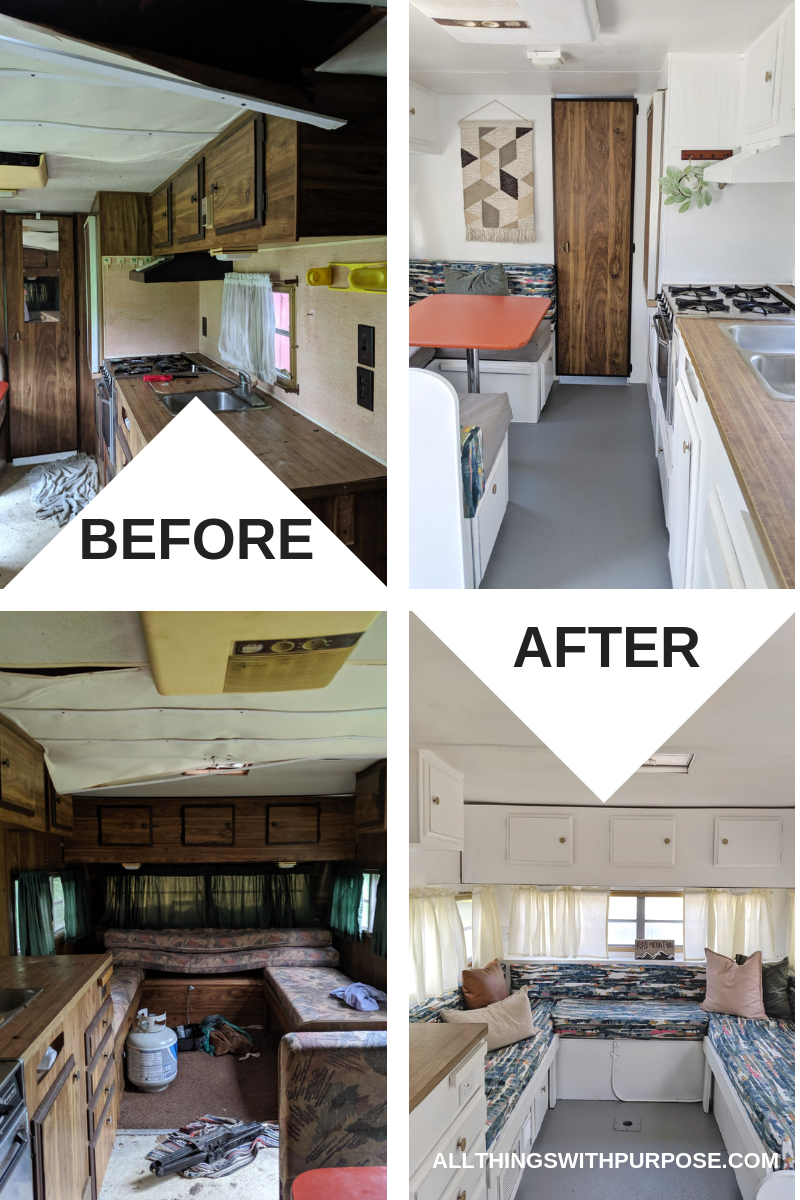
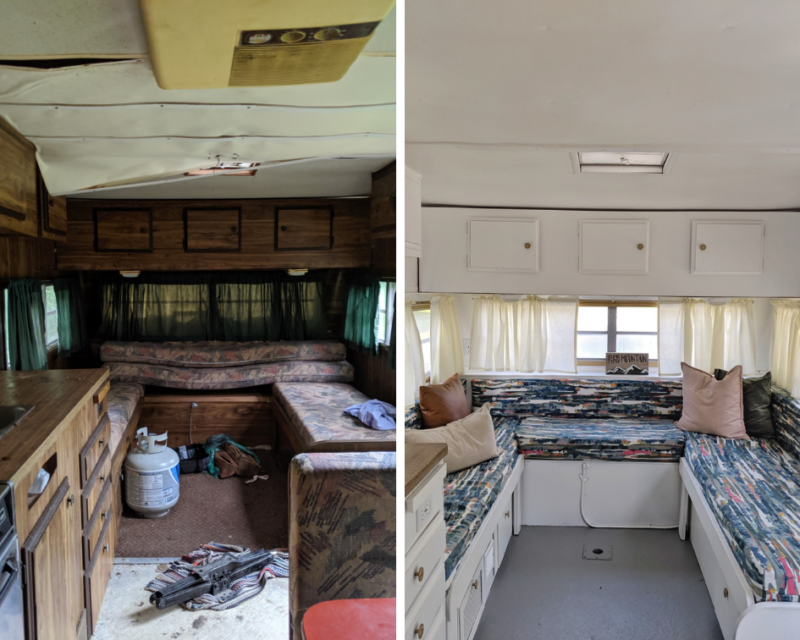
I love me a good before and after! The transformation of this vintage camper wouldn’t be as satisfying if there wasn’t a before picture to look back on. Check out these comparison shots.
What Was Done
This vintage trailer falls into the category of; quick flip. I would do so much more with it if I had the time, but life is cray! We decided to fix the major issues, seal out leaks, clean out filth, get rid of the smell, and make it look 100 times better than it did, on a small budget.
Here’s what we did:
- Tore out ceiling and wood that had water damage
- Repaired/replaced ceiling
- New rubber roof coating to make things water tight
- Primed and painted basically everything
- Sealed up around shower
- Installed new toilet
- Recovered cushions
- Sewed new curtains
- Spray painted curtain rods
- Spray painted air conditioner cover
- Primed and painted exterior
- Tested water lines and electrical
- Tested AC, heater and fridge
- Deep cleaned sinks and stove top
- Installed new tongue jack
- Filed tires with air

Products We Used
Here’s a list of the particular products we used on this project:
- Gripper interior/exterior primer from the Home Depot
- Glidden interior paint in white
- Glidden exterior paint in Minerva
- Fabric on cushions: Curtains from IKEA
- Shower curtain
- Toilet
- Behr porch and floor paint in premixed gray
- Peel and stick subway tile
- Artwork from Target
- Leather pillow
- All other pillows from IKEA
- My favorite caulk
- Plastic panels to repair the ceiling
- Rubber roof coating
If you have specific questions, I’d be happy to answer them!
This trailer is currently for sale. Find more details here: Vintage Trailer for Sale




Gencie Gilliamsen
Hi Sarah. I just sent a message to you about the 2003 Fleetwood Wilderness Camper. I forgot to include it in my message that I am on a very small budget. I will have to accomplish the renovations one tiny project at a time. Please forgive me for not checking the spelling in my last comment before sending it. Lol. You truly have inspired me not to give up today. Thank you for taking the time to put this information out there. It is a wonderful thing you were doing!!!
Sarah Lemp
Hi Gencie! I am so sorry that happened to you! Unfortunately, it is all too common. :( When purchasing, I always assume there is damage that the seller is not disclosing. It will definitely be a challenge to live in the RV while renovating, but try to take it one section at a time. Seal it up really good on the outside before starting anything inside. I would highly recommend joining my RV renovating Facebook group if you haven’t already! https://www.facebook.com/groups/camperrenovating
Gencie Gilliamsen
Joining your Facebook group sounds like a wonderful thing to do for sure! I will have to get a Facebook account first. I do have a very large tarp over the entire camper for now to keep any more water damage from happening. The weather here right now along with working two jobs six days a week from early morning until 1130 at night do not permit me to be able to rubber seal or do some thing to the roof as of yet. So at this time I will be starting with the holes around where the water pump motor is in my bedroom. It is a very small rotten place, but must be fixed. The kitchen and living room area on the complete end at the entrance door, 8 foot wide by 4 foot wide, has serious holes in the floor from the water damage. In order to be able to use my kitchen and to get in and out of the camper into that area , since my slide will not allow me to pass from my bedroom to my kitchen, I have no choice but to go ahead and fix the floor area first. There is no way for me to get the slide out from all of the damage. I have no idea what I’m going to do about that lol. I just know that I’m not going to give up. when somebody gives you lemons make some lemonade lol. On my budget when the weather does permit, what rubber coating do you recommend for the roof of the camper? Also, do I have to do the whole roof or could I do half of the roof and then the other half at another time ? Since the materials are a little pricey. Thank you again for any advice you have. It is hugely appreciated.
Gencie Gilliamsen
Hi Sarah! I have been very inspired today while reading and looking at all of the things you have done with campers. I have just purchased a 2003 Fleetwood Wilderness 30 foot pull behind camper. I have been very discouraged as everything I was told about the camper basically is not true. It took my 78-year-old father and I for days to get at home. We had to purchase new tires and a room. then my fathers transmission caught on fire in trying to pull it out of the location where it was. We did call a wonderful service man named Chief to come and pull my dad‘s truck and camper out. The brakes were locked up on one side of the camper and they had a car tire on it. I finally have the camper back home after calling my boss to drive 2 1/2 hours down to South Georgia and tow us all back. My intention is to live in this camper. I am 54 years old and it will be my first home. There is water damage along the back wall inside wall in the kitchen dining room area. There is also water damage in that same area on the floor. In addition to that the wiring for the electrical underneath the trailer has all been cut in different places and eat up by the blowouts, the previous owner had in moving the camper and not properly tying them up. There are leaks all over in different areas of the camper which they did not steal like they said. Could you please help me as I am so overwhelmed and need to know where to start. I will be placing the camper on a rented lot in about two weeks and then will be able to begin the renovation process . Please keep in mind. I will be living in this camper as all of this is going on. I would really appreciate your help and motivation. Thank you so much you have done wonderful things with your camper and I know where there’s a will there’s a way. All things do you have a purpose.
Lisa
What did you use to paint the exterior?
Sarah Lemp
See all the details here: https://www.allthingswithpurpose.com/painting-the-exterior-of-an-rv-or-trailer/
Frank Hemphill
Hi,
I have an early 60’s camper and having trouble finding exterior parts like replacement lights, windows, seals, door handle, etc. Any idea where to search would be appreciated!!
Janelle Lynn Paproski
Hi there, I’m wondering if you put a backsplash in and if you perhaps put it right over the wallpaper. Thanks
Chris Griffin
Looks awesome. Where did you buy your toilet to fit your vintage travel trailer? I have a 1976 Fleetwood prowler that I’m remodeling right now and trying to find a new toilet but it’s a very small bathroom.
Julia
We just finished our 1972 Prowler and got a toilet from camping world. When redoing our shower, I couldn’t find a small square shower pan. We ended up getting a longer pan and putting the toilet in it as well. Works great.
Dave Kinkade
Hi Sarah, a question about the exterior painting. Did you use basic exterior house paint on the aluminum? I clicked the link but it went to Glidden interior paint. Did you guys just roll the paint or did you use a sprayer? The results look very nice and it’s clear you weren’t trying to overdo it or make it look like anything other than what it was…cheap ‘n cheerful.
Sarah Lemp
Hi Dave! Thank you for the comment! We rolled on exterior paint. I’m not sure why the link is going to interior, but it’s definitely exterior!
Matt
Dave
We sprayed ours and it came out beautiful.. e mail me and I will share the pictures.
Marilyn Ramos
First, great job! It looks amazing! I am just starting the process of remodeling our 1983 travel trailer, and have some water damage in the ceiling but on the inside of the cabinets. When you replaced the ceiling, did you remove the cabinets? I want to keep ours, but I’m trying to figure out the best approach for fixing the damage, without ruining the cabinets. Where you have your fridge, we have a closet, but its a built in just like yours. There’s water damage there and in the cabinets above the sink. It looks almost identical to yours on the inside. Any input would be amazing! Thank you!
ELIZABETH ROCK
We are currently underway with a 1985 Scotty renovation and discovered water damage at a corner seam that runs a couple of feet down the side. Any advice would be appreciated.
Janet Stewart
Hello, I’m a single Mom living in the southern part of the US. I have a ’51 Spartanette that I desperately need/want to renovate. The pandemic has been hard on many, I lost nearly all of my work. I’ve been told that I need to first repair the broken windows.. This seems like an overwhelming task, I think if I could get past that… The rest would be doable. I’m so glad that I found your website!
Robin Lindsey
Thanks for this before and after! We just bought a 1977 Coachman Cadet and will begin our process soon! Love any additional advice you can offer. Thanks! Robin Lindsey
Carlee Slover
I am curious, did you save the original cupboard doors and drawers? I just got a 1973 Terry Trailer that I am fixing up. I plan on reusing the doors and drawers, I have been reading up on the correct method. Love your make over and page. Thank you for the inspiration
Craig Gauvreau
I love what you did with the trailer.I have some great ideas now. Your paint choices really brightened it up. I have bought a 1987 vanguard motor home. I wanted to get something big enough to pull our horse trailer but not a huge house on wheels.
It’s turned out to be quite the fixer upper. The adventure begins.
Do you have some during renovations pictures.
Nice work
Cheers
Lori Menshew
I just bought a 1977prowler..i have removed all paneling..and doing reno..
I am looking forward to getting finished..yours is beautiful..same set up
Justin
We have a very similar trailer! Unfortunately the door is no longer working well. Any advise how to replace it? also how to reseal/ warter proof the roof?
Jeff Lynn
You did a great job on this camper. Can I borrow you and your friends to work on mine? :) How did you adhere the ceiling panels? I see them at Home Depot with a track for the edges, but how did you keep the center of the panels from sagging?
Sarah Lemp
Thank you! The panels are secured to ceiling joists with either a staple gun or finish nailer. I’ve never had issues with the middle sagging if there are plenty of joists to secure them to. The edges can be secured with caulk or trim which helps hold them in place too.
Ricci
Hi Sarah,
Have you ever used pre pasted vinyl strip flooring in a camper? I bought it and it says to put latex base flooring primer on subfloor, and make sure it specifically designed for prepared flooring and also to use a 100 lb roller , the prepared glue is pressured-sensitive, do u have to do this in a camper ????
Toriana Vrooman
I love love love your work!! I just bought a 1977 Holiday Rambler RV and was telling my husband i wanted to put new carpet as i wasn’t to fond of the orange carpet. But after seeing your work i want to redo everything!!! The only problem is i am not creative and haven’t accomplished and D.I.Ys. I do not know where to start!!
sara
I have a 1977 coachmen cadet as well and did you use JUST liquid sandpaper or did you do both liquid sandpaper and then additionally sand the fake wood laminate that is covering every inch of that camper? including the cabinets and doors. I want to paint everything!
also, a cost effective way to make the counter tops look cool but last, what do you suggest? I saw on another blog they used contact paper but that seems like it would eventually bubble or peel back or accidentally get nicked.
my color scheme is going to be real wood floors (brown) the previous owner replaced, navy blue, white, and possibly some gray accents.
thank you!!
Sarah Lemp
Hi Sara! There isn’t really a point to sanding laminate – I’d just use a liquid sander or some sort of stripping liquid to remove any glossy finish. You want it to be as flat looking as possible and then use a bonding primer or paint with chalkpaint! I have used counter top refinishing paint or kits that turn out pretty good. I think they last longer than contact paper.
Carley
I have a small 1980s lit•l•mate project trailer. I would LOVE to paint the cabinets.. but each one has a shiny plastic trim around it. Which appears to be the same as this project.. how do you get around that? Should i use a seperate plastic primer?
Sarah Lemp
Hi Carley! I would recommend priming them first with Gripper or Stix primer before painting – but there’s no reason you can’t just paint over them :)
Yvonne
Do you paint right over the vinyl covered cabinets and doors?
Sarah Lemp
Yvonne,
Yes! Surface prep is key – make sure they are completely clean with no greasy residue – use a primer like Gripper or Stix before painting OR use a chalk paint. I’ve had great results with both!
Mary
Lovely transformation! This is my first time with your website and I am intrigued.
I recently picked up a few RV cushions (free at curb!) and removed the covers to clean and found the foam wrapped in plastic wrap! How cool is that and made it really easy to get the covers back on…I am sure it helps protect the cushions from spills. Thanks
Amanda
Hey! How do you reupholster your cushions yourself? We actually scrapped an RV project a while back because we couldn’t figure out how to do it inexpensively. First we tried ‘washing’ the cushions after we stripped off the old covers… but mistake #1 was using dishsoap. So bubbly it never washes out, even after hours of rinsing. Then they would never dry. Thought about reupholstering ourselves, but I can sew a straight line and that’s about it. No idea how to do a zipper, buttons, snaps, etc. Then we looked to buy new cushions. Couldn’t find any to fit (even checked the garden department at home improvement stores). Then went to a fabric shop to buy foam for cushions… it was going to be over $500 just for the foam. The darn cushions are making me leery of giving it another go.
Sarah Lemp
Hi Amanda! That is a GREAT question, and an even better idea for a blog post I should write!! :) For this particular trailer, we removed the old cushion covers and cleaned the foam with vodka! I learned a while ago that vodka makes a great disinfectant and that it doesn’t leave a residue or scent behind. Next, we covered the cushions using old IKEA curtains I had on hand. IKEA curtain fabric is a great alternative to upholstery fabric because it is heavy duty but super cheap and you get a lot of it. I suggest sewing pieces together like a pillow case. You could even keep one end open and just tuck the edges under or pin them. An other option is to cut a piece of lightweight wood to fit one side of your cushion (which will now be the bottom) and wrap the cushion in fabric, stapling the fabric onto the wood. Look for a full blog post to come ;)
Randy Higgins
Ohhh!!! The plywood idea behind/under the cushions is GREAT! I have recovered my boat seats that way. I hadn’t thought to do this. I am so glad i saw this. I just picked up an old Coachmen camper and the cushion covers are really worn and dirty.
Lisa thibodeaux
How do I paint cabinet that is not real wood ? It’s dark brown I would love to paint white?
Sarah Lemp
I would clean the surface really well and use a degreaser or liquid sander to get rid of any shine. Lightly sand if necessary. Use a good primer like Stix or Gripper! You could also prep your surface and skip the primer by using a chalk paint!
Nana Diana
You did a really fantastic job…looks like a completely different travel trailer. Thanks for sharing it here…so much fun to see the transformation.