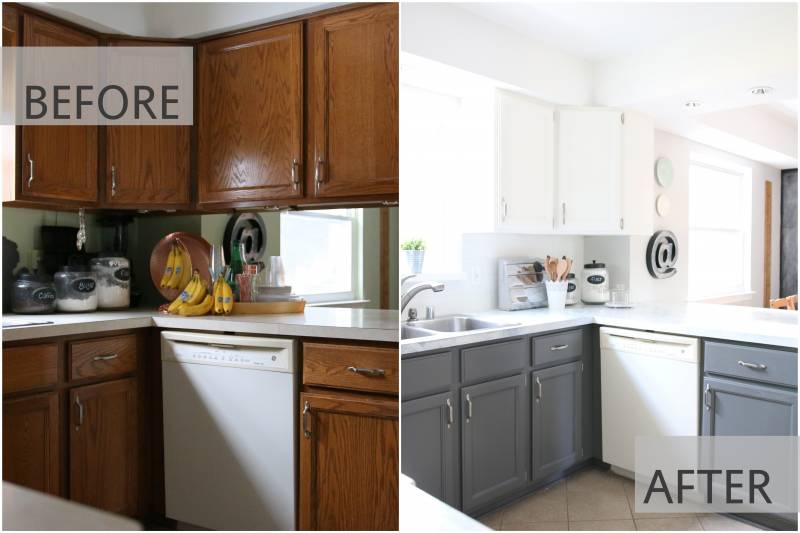
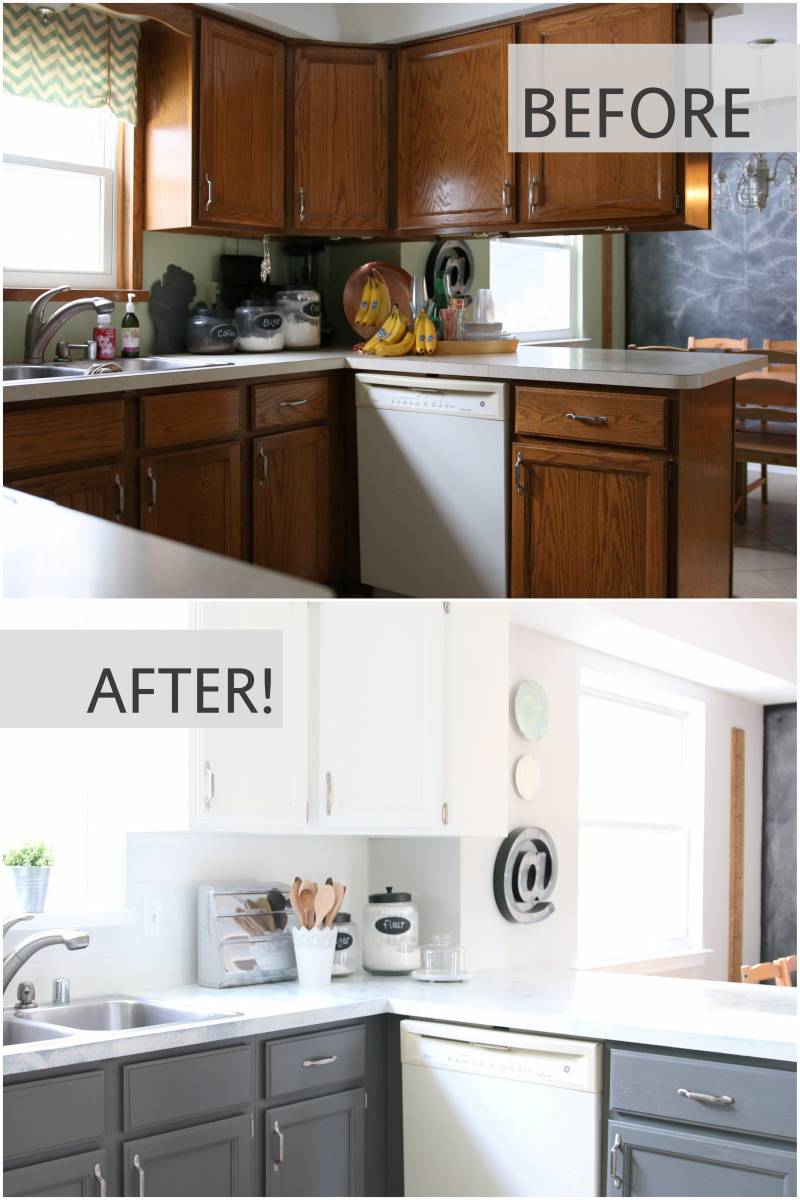
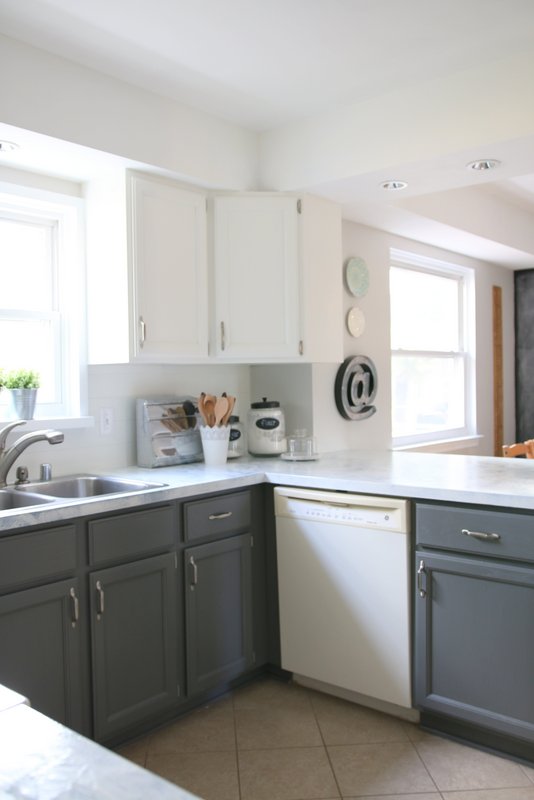
Budget Kitchen Makeover
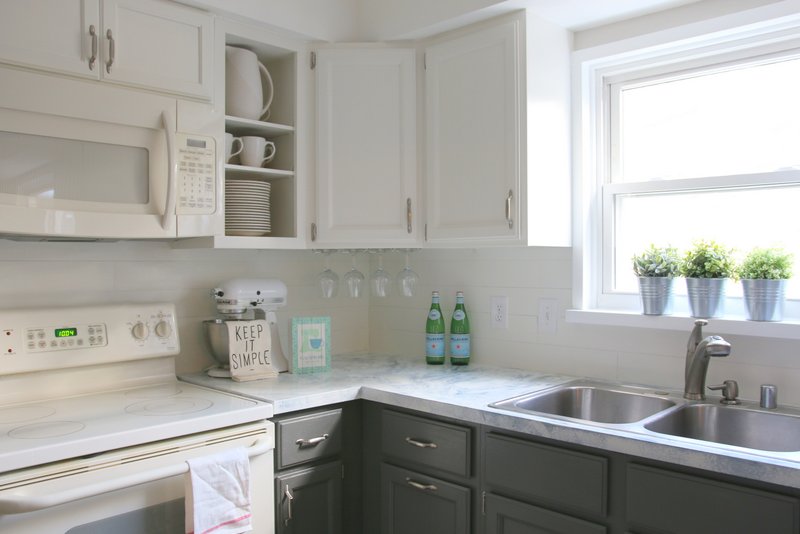
I am SO excited to finally share the before and after shots of my Fixer Upper inspired kitchen redo!! I’ve been channeling my inner Joanna Gaines, tearing down walls, and installing shiplap like mad. Can you say “major improvement??!!” Can you believe the contrast from dark and dreary to light and bright? I am just smitten. And here’s the real clincher; I did all this for about $300!!!
The Plan
I have been anxious to start on this project for years. I’ve dreamed and planned and pinterested up a storm. Now, after 2 weeks of non-stop painting, sanding, and faux marbling – I am ready to take a painting hiatus for a couple of years!
Did you catch my original post about achieving the “Fixer Upper” inspired look? You may want to check it out: HERE
Here’s what I did
A summary of the steps I took:
- Removed the upper cabinets from above the bar area
- Removed the doors on two uppers around the stove
- Primed everything using Stix Primer
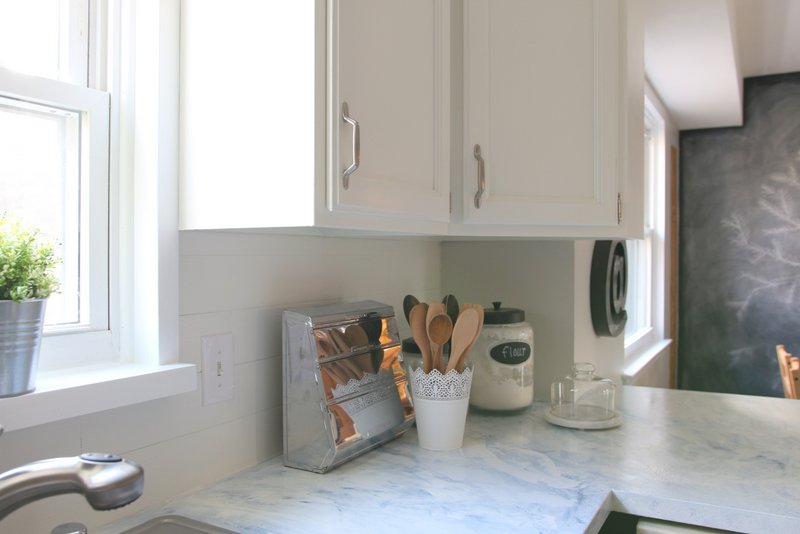
- Installed a faux shiplap backsplash using peel and stick vinyl floor planks
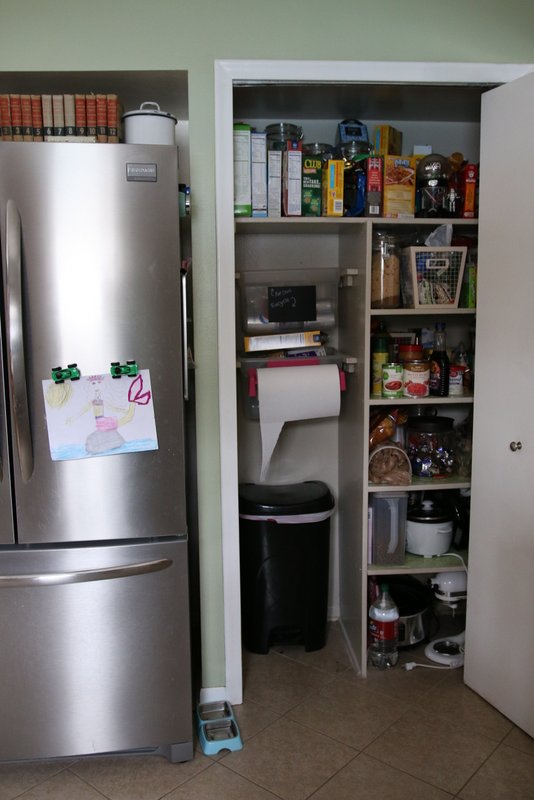
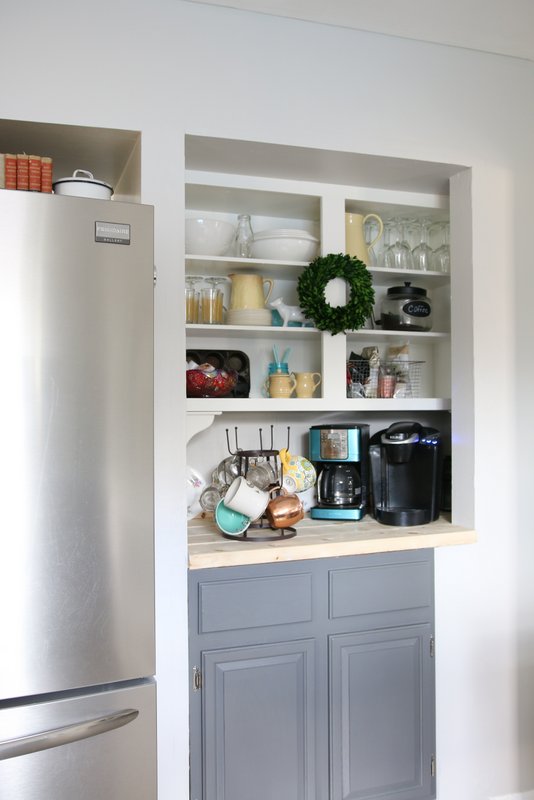
- Removed the bi-fold doors to the pantry and all the shelves
- Hung the upper cabinet (that was above the bar) in the old pantry
- Bought a used lower cabinet at the Habitat for Humanity ReStore for in the pantry
- Used 2×6 boards to create a faux butcher’s block counter in the pantry turned coffee bar
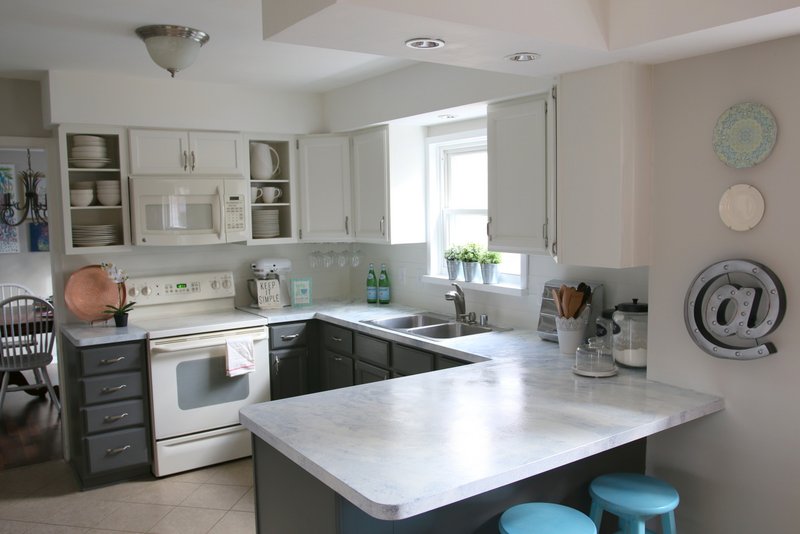
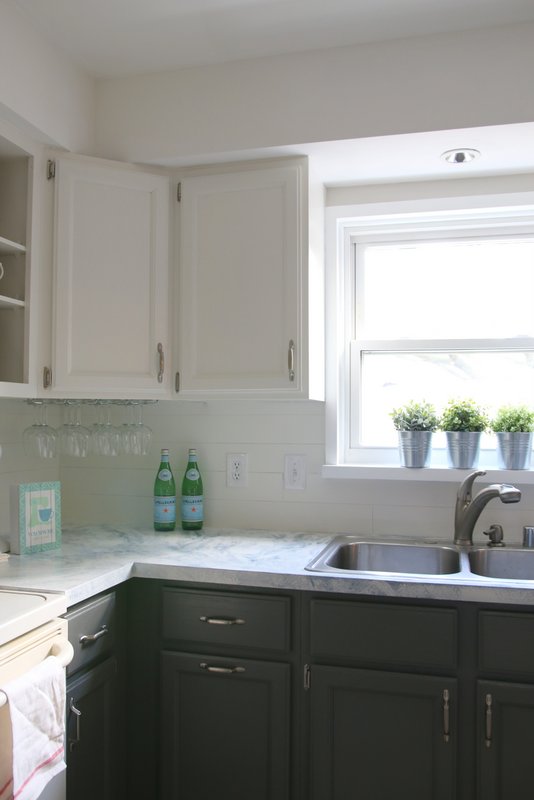
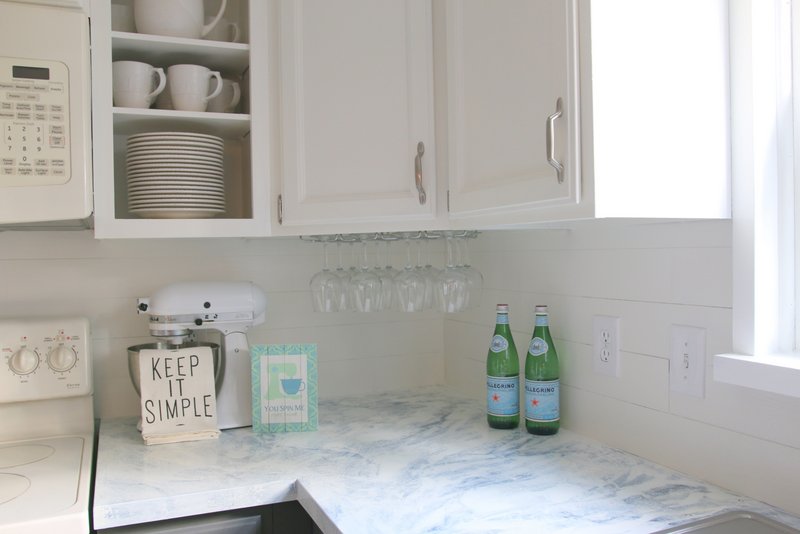
- Painted the upper cabinets with Benjamin Moore Advanced paint in Dove White
- Lower cabinets painted with Benjamin Moore Advanced paint in Kendall Charcoal
- Painted the walls with Glidden paint in Smooth Stone
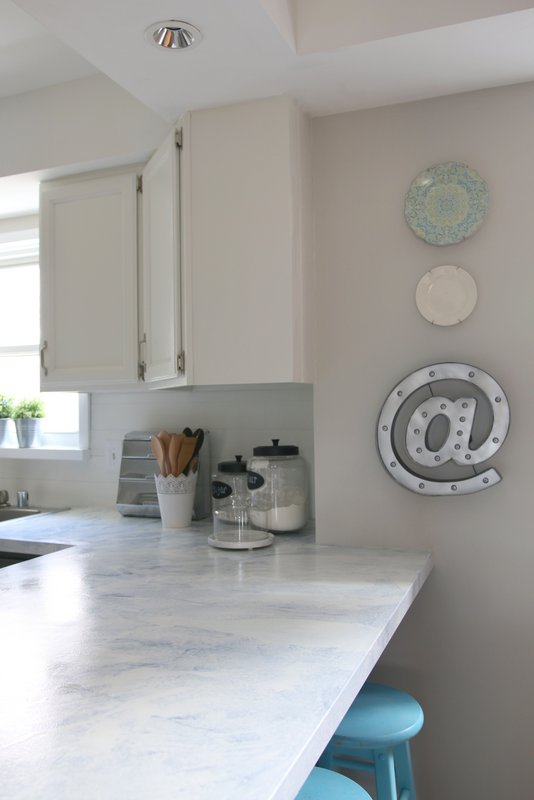
- Created a faux marble finish on the countertops using Stix primer, Glidden flat white paint, and charcoal craft paint, and a Giani brand Top Coat
- Installed recessed lighting in bulkheads
- New switch plate covers
- Installed a new trash can inside a cabinet
- Clean and organized, decluttered and downsized!!
Price Breakdown of Major Improvements
Here’s the cost involved in this project:
- Stix Primer – $50
- Benjamin Moore Advanced Paint for Cabinets – $100
- Top Coat for Countertops – $25
- Glidden Wall Paint – $25
- Peel ‘n Stick Vinyl Flooring (for backsplash) – $20
- Used Lower Cabinet – $20
- Recessed Lighting – $60
- 2 4X6 Wood Planks – $8
Things I Already Had:
- All the tools needed
- I updated the hardware on the cabinets a few years ago and spent about $40 on the value packs from Home Depot
- The Glidden wall paint and colors I used on the countertops
- Ceiling paint and black craft paint for countertops
- Sandpaper
- I updated the flooring a few years ago using groutable vinyl tile
Things I Almost Did, Then Didn’t:
- I was able to add a little shiplap into my life for about $20 and I really wanted to use SUBWAY TILE somewhere. Having purchased metal peel and stick subway tile from Menards, I was prepared to use them on my coffee bar area when I decided it just wasn’t worth it. I couldn’t justify the price for a spot that was almost completely covered by coffee pots!

Supply List and Paint Colors
Here’s what you’ll need:
- Liquid Sander (Deglosser) for the Cabinets: Home Depot or find it on Amazon
- Stix Primer: Amazon
- Benjamin Moore Paint in White Dove (upper cabinets and shiplap)
- Benjamin Moore Paint in Kendall Charcoal (lower cabinets)
- Glidden Paint in Smooth Stone (on walls)
- Wine glass rack (holds 12 glasses): Amazon
- Mug rack: Amazon
- Recessed lights: Home Depot
- “@” sign: Amazon
- “You Spin Me Round” sign: Cracker Barrel
- Plate holders: Amazon
- Copper tray: Target (Similar)
- Michigan slate board: Bed Bath and Beyond
- Metal buckets and silk plants: IKEA
- “Keep it Simple” tea towel: Target
- White and red tea towel: IKEA
- White scalloped bucket and wooden spoons: IKEA
- Giani top coat for countertops: Amazon
- Turquoise coffee pot: Kohls
- Silk orchid: IKEA
- Table: IKEA
- Chandelier with light cages: find my tutorial here
- Handles for cabinets: Home Depot
- Boxwood wreath: Target (Similar)
- Slide-out trash can: Amazon
NEXT UP IN THIS SERIES…
Here are the next things on my to-do list:
- Install a Faux Shiplap Backsplash Using Peel ‘n Stick Flooring
- Paint a Faux Marble Countertop
- Convert a Pantry to a Coffee Bar
- Paint Cabinets without Sanding
- Custom Cabinet Upgrades and Organization on a Budget
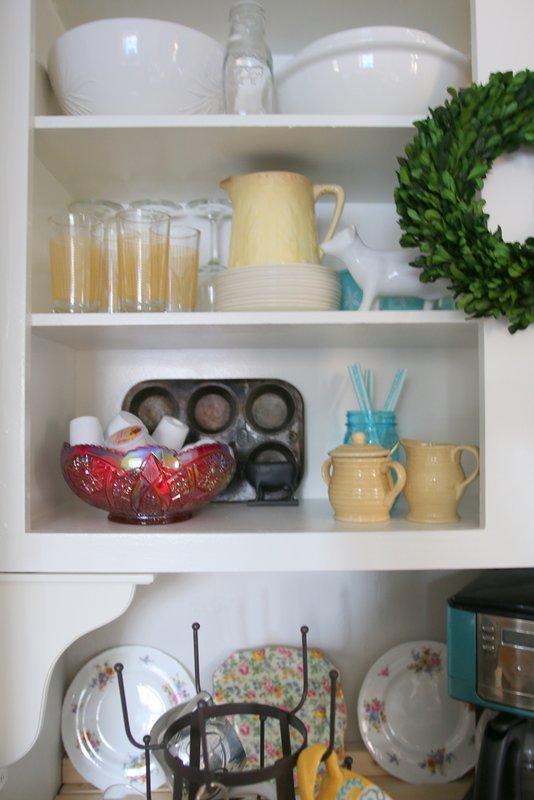
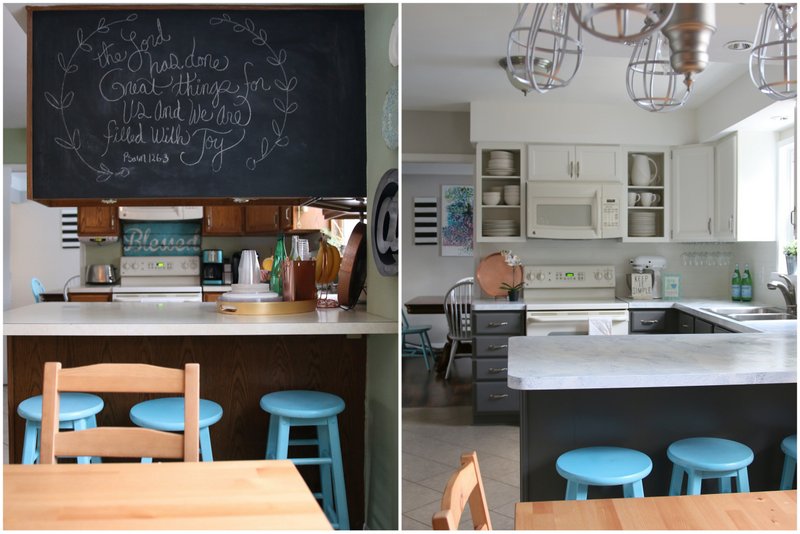
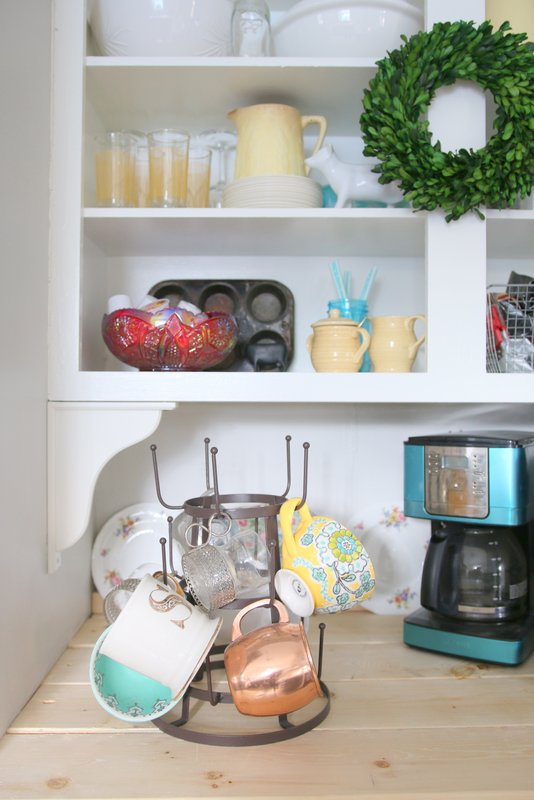
I’m so excited about this coffee bar area! The base cabinet was $20 from the Habitat for Humanity ReStore, the upper was repurposed from another part of the kitchen. I used 4×6 planks to create a faux butcher block counter. THIS IS NOT DONE! It’s one major thing I have yet to finish. It still needs to be sealed and polyurethaned. But it was close enough to take a few pictures!
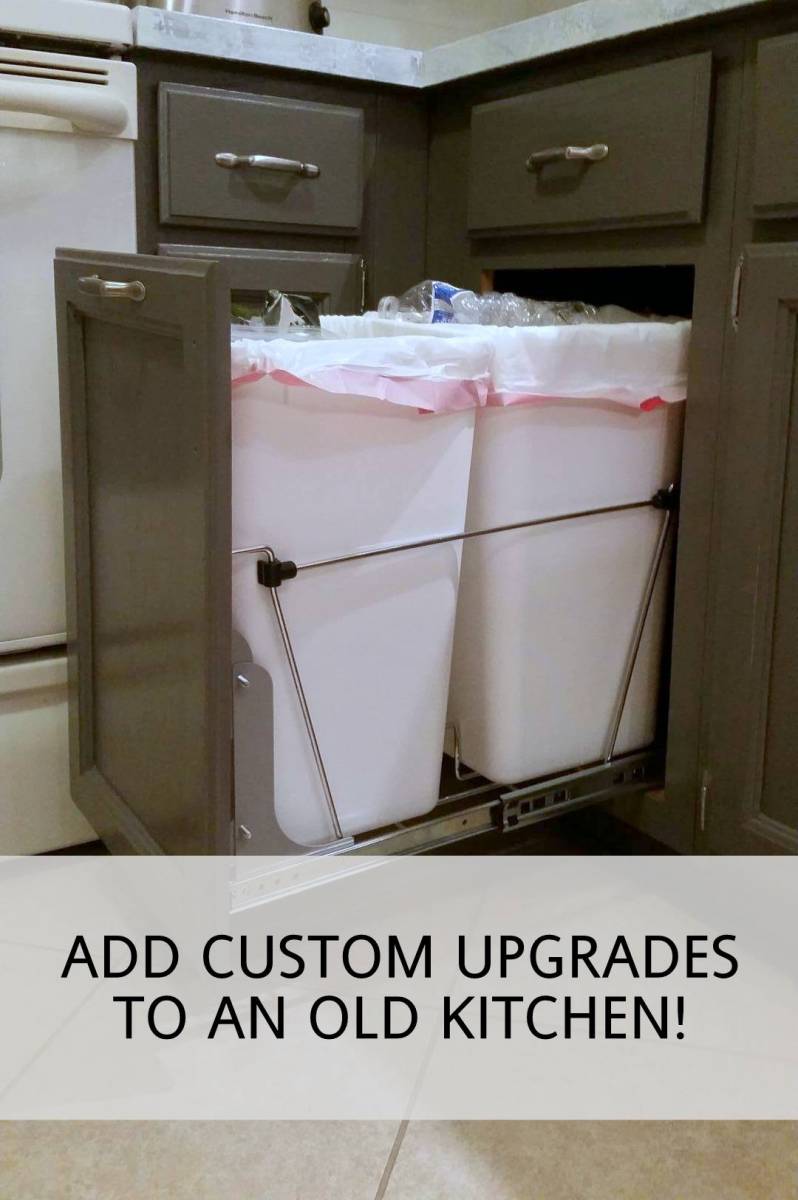
One issue that had to be tackled after demolishing the pantry and turning it into a coffee bar, was where to store the trash can! I am so excited about this kit I found which turned an annoying corner cabinet into a useful and custom-feeling feature! Find a kit like this here: Rev-A-Shelf
Here’s a BEFORE of the Pantry!!
And NOW…
Thanks for stopping by to tour my new kitchen!
Stay tuned for the next post in this series. I’ll be sharing a video tutorial on the
countertop painting, all the details on cabinets and more!!
Lucas
You did so well! Specially for the amount of money spent too, cheap and beautiful.
Kara
Love your kitchen!! My husband and I (plus 4 kids and soon to be 3 dogs!) are moving to a smaller home this summer. This is exactly what I want to do to the kitchen! I’ll have a similar pantry that I’d love to make a coffee bar like this. My question is where did you put all the pantry “stuff?” I’m a bit neurotic and can’t stand clutter, so I’m worried I’ll have all my pantry goods shoved in a cabinet and driving me crazy!! I’d love to hear how you organized those things!
Sarah Lemp
Hi Kara! That is a great question! I was ok with relocating a lot of that pantry stuff because I had additional pantry space in my laundry room. Find the post here: https://www.allthingswithpurpose.com/laundry-room-and-pantry-remodel-on-a-budget/
Beth
I’ve been looking for ideas to up date my kitchen (for the 5th time) for a while now. Even if money was no object(which it is), I would not invest it in this house. Ever see the movie Money Pit? That’s what my husband and I purchased 30 years ago and have been living in every since. We’ve sunk large sums of money just to keep this house standing. Have had to have a new foundation twice and the cracks are returning. Don’t even get me started on the pool and black mold. But my kitchen needs a face lift so I’ve spent the past 6 months on google, looking for something I like but wouldn’t break the bank. All I have decided on was white and grey cabinets. Then today I came upon your fixer upper and saw my exact kitchen in your before pictures. Same layout, ugly cabinets included. I even have a Giani counter top kit I purchased and have just been staring at, too scared to put it on. But you my friend have given me some needed inspiration. Of all the sites I’ve been to with “How to remodel your .kitchen on a budget”, and there are thousands out there, you have hit a home run. Really, you are my new hero. What a genius idea removing your pantry door and upper cabinets to create such a cute space. And as I mentioned before, since my layout is the same, it actually seems quite doable. I love everything about your new fixer upper including the price tag. So I just want to say thank you for giving this old gal some hope and I look forward to seeing what else you have up your sleeve!!
Sarah Lemp
Hi Beth!! You have totally made my day with your kind words! I’m excited you have been inspired and can’t wait to hear what you end up doing! Pleases reach out and share your final project when you are done :)
Alexa Jordan
I love a good fixer upper.
Michael
Wow. I am thoroughly impressed in your kitchen rejuvenation. You did an outstanding job and it goes to show you what can be done with a small budget and some great ideas. A little paint can sure go a long way! Thanks so much for sharing.
Traci Blaze
Hi! I’m thinking of attempting this project in my kitchen! Love the idea and just so happen to have a couple of boxes of peel and stick planks leftover from a previous project.
I was wondering what you did at the end of wall? Did you add a molding? Just paint edges white? I have a couple spots that will be “open ends”.
Thanks so much & I love your kitchen!
Sue
$300??? LESS THAN THREE HUNDRED DOLLARS??? You are a Wizard, my Dear!!! Fabulous kitchen, if it were mine I would NEVER leave it~~~ (there IS room in there for a little bed, right?? Hahaha)
Thanks for posting!
Renee
Off topic—I see you have the Frigidaire Gallery fridge—- Do you love it?? I am looking at purchasing here shortly and am so anxious about making the final decision!!
Sarah Lemp
Hey Renee! I do love my Frigidaire fridge! The only thing I’d say is the “fingerprint free” finish we got has easily gotten scratched up. The kids put magnets on it and moved them around and it has left some streaks. They’re not bad, but I’ve wondered if that type of finish shows scratches worse….? I’m not really sure. Other than that it has been great :)
BeckyKay
That is incredible! You did a great job! It looks so big and bright and open!
Kelly Palmer
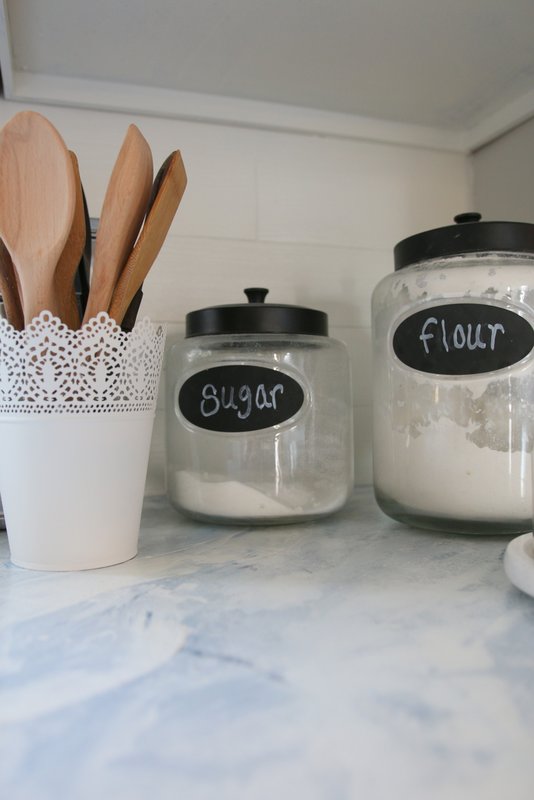
Your kitchen is beautiful! Can you tell me please where you found the glass canister containers that your flour and sugar are stored in? Thanks :)
Sarah Lemp
Thanks Kelly! I found my canisters years ago at TJMaxx, but here is a similar set: http://amzn.to/20Rngie
Sarah Jean Griffin
Our kitchen looks very similar to yours and we are redoing it about the same. Our wall color is revere pewter so it’s gray in some lighting and beige in others. I think we have the same beige tile. How do your gray cabinets look against the gray?
Deana
Fabulous! This is the first time I have seen a kitchen that looks almost like mine that has been updated so well. I have searched Pinterest and everywhere else to find ideas and this is the very best fit. Thanks for posting.
Katie
Hi!! I ABSOLUTELY love this and talk about timing!! I have a piece of peel and stick on my craft table right now painted with chalk paint and waiting for its final coat of some type of washable matte finish..What type of paint did you use on your faux shiplap? Does it wipe well? Would LOVE and APPRECIATE any all feedback and personal opinion!!
Sarah Lemp
Hey Katie!! I just finished posting all the details on the shiplap backsplash! You can find it here: https://www.allthingswithpurpose.com/2016/02/faux-shiplap-backsplash-peel-n-stick-flooring/
ange
What a beautiful transformation! I am planning on painting my countertops to faux marble as well. Curious what made you decide to go with the gianni over an epoxy? Love how it turned out!
Sarah Lemp
Hey Ange! I think I just addressed that question in my follow-up post about the countertops! I included a video tutorial and all the reasons I went the latex route. https://www.allthingswithpurpose.com/2016/02/faux-marble-painted-countertops/
Tania
Wow, this is really beautiful! Your kitchen is the same layout as mine and your choice of dark base cabinets and light upper cabinets is exactly how I’m planning to paint my kitchen this spring!
Tania
Cecilia
Shut up!! Peel and stick vinyl for the shiplap? Oh my. You just don’t know how perfect the timing is on this post…I am planning my kitchen upgrade and was wanting to paint lower cabinets a darker color and use planking or beadboard on the backsplash. Hurray! Pictures to show my husband. He’ll be impressed!
Sarah Lemp
I know!!! Right??? Game changer for sure! Glad to be of help ;)